解決 WordPress 上傳檔案/佈景主題/外掛大小問題

最近在上傳 soledad 佈景主題時,發生連結過期問題,後來發現是新網站的上傳檔案大小限制問題。

前往php.ini

然後設置以下參數:

upload_max_filesize: 10 MB
max_post_size: 10 MB
max_execution_time: 300

設定好上方參數之後,應該就可以上傳 wordpress 檔案/佈景主題/外掛 了。

參考:How To Fix “The Link You Followed Has Expired” WordPress Error

先前也寫過一篇教學文章:php設定檔案上傳大小的限制(使用ubuntu)

在Ubuntu 22.04 安裝Apche+mysql+php+phpmyadmin

安裝步驟如下:

sudo apt-get update
sudo apt-get upgrade

一、安裝Apache

sudo apt-get install apache2
之後輸入網址會出現 "Apache2 Default Page"
sudo a2enmod rewrite #若有需要,自行開啟mod_rewrite
sudo a2enmod proxy_http #若有需要,自行開啟proxy_http
sudo a2enmod proxy_balancer #若有需要,自行開啟proxy_balancer

二、安裝php

sudo apt-get install php8.1 # 可以用 php-v 查看一下php版本
sudo apt-get install php8.1-mysql
sudo apt-get install php-curl
sudo service apache2 restart

三、安裝Mysql

sudo apt-get install mysql-server
安裝完可以登入mysql看看
sudo mysql -u root -p


登入後,看一下資料庫:
show databases;

四、安裝Phpmyadmin

sudo apt-get install phpmyadmin php-mbstring #過程中會出現一系列設定,按步驟設定即可
(預設安裝目錄為/usr/share/phpmyadmin)

phpmyadmin預設路徑是/usr/share/phpmyadmin,所以可以做個軟連結,讓我們可以直接在網址打manage.admin.domain-name.com:

cd /srv
ln -s /usr/share/phpmyadmin admin

上述設定完之後再到 /etc/apache2/sites-available/ 將 manage.admin.domain-name.com 的路徑指向 /srv/admin。

<VirtualHost *:80>
     ServerName manage.admin.domain-name.com
     DocumentRoot /srv/admin/

     <Directory /srv/admin>
        Options Indexes FollowSymLinks MultiViews
         AllowOverride ALL

       require all granted
#      Require all denied
#      Require ip 111.222.333.444
     
     </Directory>
</VirtualHost>


另外 /etc/apache2/sites-enable/ 也需要設定軟連結指向 /etc/apache2/sites-available/ 中的 conf 檔案。

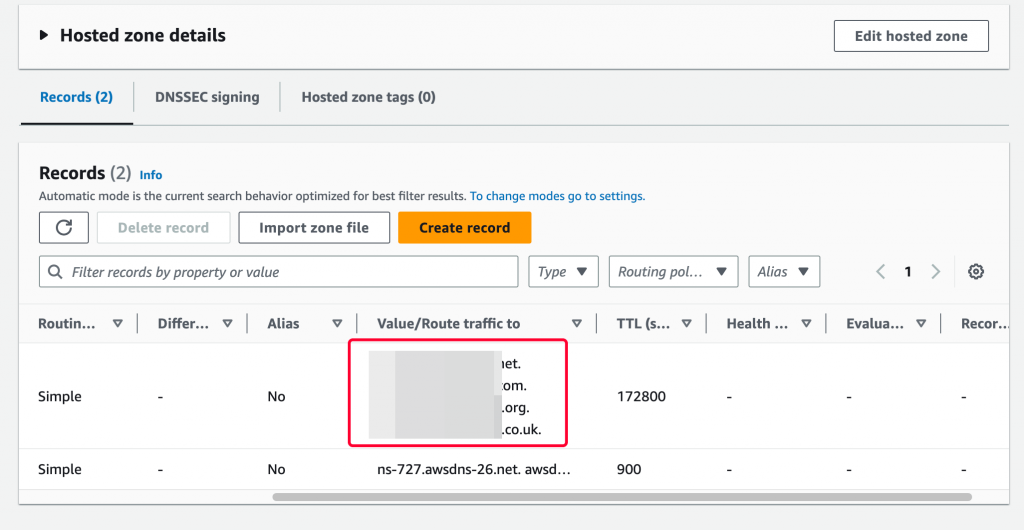
當然 Route 53 那邊也需要設定一筆 manage.admin.domain-name.com: 的 A record。
設定好之後重啟 apache2,在網址打 manage.admin.domain-name.com 即可登入phpmyadmin

Ubuntu 20.04 / 22.04 安裝Phpmyadmin,會有無法透過phpmyadmin來登入root的問題,可以參考下面文章解決:

解決Ubuntu 18.04 以上,安裝mysql之後不能用phpmyadmin登入root問題

AWS EC2 新主機DNS設定與網路中文DNS設定

在 AWS EC2 開好新主機之後,還需要設定 DNS,首先先到 AWS Route 53 裡面新增 Hosted zone,然後找到下圖中的 Value/Route,選擇其中的兩個即可。

接下來登入網路中文,找到你要設定 DNS 的那個域名,點擊進入。

接下來選擇 DNS 設定,然後選擇「自管」,然後你就會看到需要新增兩條 DNS 設定,分別是主機名稱跟ip位址:

主機名稱:剛剛在 Route 53 的欄位中選定兩條
IP 位址:使用 nslookup 去看上面那兩條的 ip 位址,填入即可。

上面設定完之後,再回到 Route 53 設定一筆 A record, A record 的ip位址就是 EC2 綁定的 Elastic IP。

上面都完成之後,你就可以使用: ssh username@domain-name.com 來登入主機了。

解決Adsense ads.txt 抓不到問題,從Apache 設定修改

如果你的網址是 www.example.com,而你網站也有裝 Adsense 廣告,那麼 Adsense 要抓取你的 ads.txt,最好是 www.example.com/ads.txt 跟 example.com/ads.txt 這兩個地方都要能正確抓到,一般如果只是 www.example.com/ads.txt 抓得到而 example.com/ads.txt 無法正確顯示,那麼 Adsense 那邊還是會抓不到。

關於這個問題看從 Apache rewrite 中修改,前往。/etc/apache2/site-avalible,找到你的設定檔之後,加入以下語法:

<VirtualHost *:443> 
  ServerName example.com 
  ... # SSL Stuff 
  Redirect "/" "https://www.example.com/" 
</VirtualHost>

將上面 example.com 改成你的網址,然後在 Redirect 那一行設定你要的重定向語法。例如下面這樣:

#解決 ads.txt問題,將example.com 導向至www.example.com,並且將example.com/ads.txt導向至 example.com/ads.txt

<VirtualHost *:443>
  ServerName example.com
  Redirect "/ads.txt" "https://www.example.com/ads.txt"
  Redirect "/" "https://www.example.com"
</VirtualHost>

參考文章:

Apache 替網站加上 Secure Referrer-Policy Header

簡單的說,就是當網站有連結連到外部網站,referrer 要包含怎樣的資訊,有以下八種設定方式,每種包含的資訊都不一樣,差別可以參考文章參考連結。

Referrer-Policy: no-referrer
Referrer-Policy: no-referrer-when-downgrade
Referrer-Policy: origin
Referrer-Policy: origin-when-cross-origin
Referrer-Policy: same-origin
Referrer-Policy: strict-origin
Referrer-Policy: strict-origin-when-cross-origin
Referrer-Policy: unsafe-url

要在 Apache 伺服器上設置Secure Referrer-Policy Header,步驟如下。

#開啟 apache headers 模組
sudo a2enmod headers

#重新啟動 apache
sudo service apache2 restart

#/etc/apache2/conf-available/security.conf ,加上 header 設定
#Secure Referrer-Policy Header 
Header set Referrer-Policy: "no-referrer"


#重新開啟 apache 
sudo service apache2 restart

#成功設定,可以試著用瀏覽器看一下 response headers 有沒有多了  Referrer-Policy 

參考:Referrer-Policy

Apache 替網站加上 browser cache 的 Header

要在 Apache 伺服器上設置browser cache Header,步驟如下。

#開啟 apache headers 模組
sudo a2enmod headers

#重新啟動 apache
sudo service apache2 restart

#/etc/apache2/conf-available/security.conf ,加上 header 設定
# browser cache
<FilesMatch "\.(ico|pdf|flv|jpg|jpeg|png|gif|js|css|swf)$">
  Header set Cache-Control "max-age=604800, public"
</FilesMatch>


#重新開啟 apache 
sudo service apache2 restart

#成功設定,可以試著用瀏覽器看一下 response headers 有沒有多了 cache control

參考:
HTTP Caching
Cache-Control

Apache 設定 X-frame Header

X-Frame-Options HTTP 回應標頭 (header) 用來指示文件是否能夠載入 (en-US), (en-US) 以及 <object> (en-US),網站可以利用 X-Frame-Options 來確保本身內容不會遭惡意嵌入道其他網站、避免 clickjacking 攻擊。

X-Frame-OptionsHeader 相關語法參考:X-Frame-Options 回應標頭

Header always append X-Frame-Options SAMEORIGIN

要在 Apache 伺服器上設置 X-Frame-Options Header,步驟如下。

#開啟 apache headers 模組
sudo a2enmod headers

#重新啟動 apache
sudo service apache2 restart

#/etc/apache2/conf-available/security.conf ,加上 header 設定
Header always append X-Frame-Options SAMEORIGIN


#重新開啟 apache 
sudo service apache2 restart

#成功設定,可以試著用瀏覽器看一下 response headers 有沒有多了X-Frame-Options SAMEORIGIN

參考:X-Frame-Options 回應標頭

Apache 設定 HSTS Header

HSTS Header 主要是告訴瀏覽器,這個頁面要用 HTTPS 來連結,這是網站安全性的問題。

HTTP Strict-Transport-Security 回應標頭(簡稱為 HSTS (en-US))告知瀏覽器應強制使用HTTPS以取代HTTP。

HSTS Header 相關語法參考:Strict-Transport-Security

Strict-Transport-Security: max-age=<expire-time>
Strict-Transport-Security: max-age=<expire-time>; includeSubDomains
Strict-Transport-Security: max-age=<expire-time>; preload

要在 Apache 伺服器上設置 HSTS Header,步驟如下。

#開啟 apache headers 模組
sudo a2enmod headers

#重新啟動 apache
sudo service apache2 restart

#/etc/apache2/conf-available/security.conf ,加上 header 設定
Header always set Strict-Transport-Security "max-age=31536000;includeSubdomains; preload"

#重新開啟 apache 
sudo service apache2 restart

#成功設定,可以試著用瀏覽器看一下 response headers 有沒有多了 Strict-Transport-Security: max-age=31536000;includeSubdomains; preload

參考:
apache 設定 HSTS ( HTTP Strict Transport Security )

Ubuntu 20.0 解決mysql binlog 檔案越來越多問題

mysql 的 binglog 檔案會越來越多越來越大,可以輸入以下指令設定 binlog 保留天數。

sudo mysql -u root -p

進入mysql 之後輸入以下

下面這行指令可以讓你查看 bin_log 是否是開啟狀態。

SHOW VARIABLES LIKE 'log_bin';

如果log_bing 是開啟的,你的伺服器就會有越來越多binlog 檔案,這樣至少要設定一下天數,避免檔案過大。

輸入下面這行指令檢查一下:

show variables like 'binlog_expire_logs_seconds';

如果你看到是 empty,也就是0 的狀態,代表沒有設置時間,也就是無保留天數,這時你可以設定成 259200 ,也就是3天。

輸入以下:

set global binlog_expire_logs_seconds=259200;
flush logs;
#記得 flush logs 一下。完成上面兩個指令之後,binglog 就會變成只保留三天了。

這時候再次輸入以下:

show variables like 'binlog_expire_logs_seconds';

這樣就可以看到結果了。259200 = 保留三天 bin_log。

參考:

【MYSQL】刪除binlog的方法

Working with MySQL Binary Logs

The Binary Log