apache access controll in 2.2 and 2.4

In this example, all requests are denied.

2.2 configuration:

Order deny,allow
Deny from all

2.4 configuration:

Require all denied

In this example, all requests are allowed.

2.2 configuration:

Order allow,deny
Allow from all

2.4 configuration:

Require all granted

In the following example, all hosts in the example.org domain are allowed access; all other hosts are denied access.

2.2 configuration:

Order Deny,Allow
Deny from all
Allow from example.org

2.4 configuration:

Require host example.org

Apache2 Ubuntu Default Page

It works!

This is the default welcome page used to test the correct operation of the Apache2 server after installation on Ubuntu systems. It is based on the equivalent page on Debian, from which the Ubuntu Apache packaging is derived. If you can read this page, it means that the Apache HTTP server installed at this site is working properly. You should replace this file (located at /var/www/html/index.html) before continuing to operate your HTTP server.

If you are a normal user of this web site and don’t know what this page is about, this probably means that the site is currently unavailable due to maintenance. If the problem persists, please contact the site’s administrator.

Configuration Overview

Ubuntu’s Apache2 default configuration is different from the upstream default configuration, and split into several files optimized for interaction with Ubuntu tools. The configuration system is fully documented in /usr/share/doc/apache2/README.Debian.gz. Refer to this for the full documentation. Documentation for the web server itself can be found by accessing the manual if the apache2-doc package was installed on this server.

The configuration layout for an Apache2 web server installation on Ubuntu systems is as follows:

/etc/apache2/
|– apache2.conf
| `– ports.conf
|– mods-enabled
| |– *.load
| `– *.conf
|– conf-enabled
| `– *.conf
|– sites-enabled
| `– *.conf

apache2.conf is the main configuration file. It puts the pieces together by including all remaining configuration files when starting up the web server.

ports.conf is always included from the main configuration file. It is used to determine the listening ports for incoming connections, and this file can be customized anytime.

Configuration files in the mods-enabled/, conf-enabled/ and sites-enabled/ directories contain particular configuration snippets which manage modules, global configuration fragments, or virtual host configurations, respectively.

They are activated by symlinking available configuration files from their respective *-available/ counterparts. These should be managed by using our helpers a2enmod, a2dismod, a2ensite, a2dissite, and a2enconf, a2disconf . See their respective man pages for detailed information.

The binary is called apache2. Due to the use of environment variables, in the default configuration, apache2 needs to be started/stopped with /etc/init.d/apache2 or apache2ctl. Calling /usr/bin/apache2 directly will not work with the default configuration.

Document Roots

By default, Ubuntu does not allow access through the web browser to any file apart of those located in /var/www, public_html directories (when enabled) and /usr/share (for web applications). If your site is using a web document root located elsewhere (such as in /srv) you may need to whitelist your document root directory in /etc/apache2/apache2.conf.

The default Ubuntu document root is /var/www/html. You can make your own virtual hosts under /var/www. This is different to previous releases which provides better security out of the box.

Reporting Problems

Please use the ubuntu-bug tool to report bugs in the Apache2 package with Ubuntu. However, check existing bug reports before reporting a new bug.

Please report bugs specific to modules (such as PHP and others) to respective packages, not to the web server itself.
WordPress:允許Contributors上傳與編輯自己的圖片

只要在functions.php加入以下程式碼即可。

//Allow Contributors to Add Media
if ( current_user_can('contributor') && !current_user_can('upload_files') )
add_action('admin_init', 'allow_contributor_uploads');
  
function allow_contributor_uploads() {
     $contributor = get_role('contributor');
     $contributor->add_cap('upload_files');
}

參考文章:
http://viralpatel.net/blogs/wordpress-allow-contributors-add-media/

Tumblr自動貼文程式:使用php api

最近在寫Tumblr自動貼文程式,大概花了半天時間,步驟如下:

步驟1.申請tumblr帳號。

很簡單,不多說。

步驟2.申請應用程式

申請頁面:https://www.tumblr.com/oauth/apps
申請完之後,會得到consumerkey跟consumersecret

步驟3.拿token

只拿到應用程式的key跟secret還不夠,我們還需要拿到oauth_token跟oauth_token_secret。

a)進入: https://www.tumblr.com/oauth/apps 這個頁面
b)點選上方的explore api,之後會要求授權,然後同意。
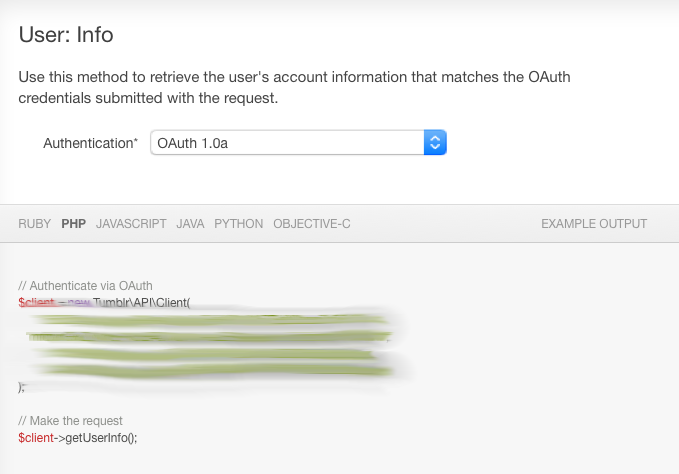
c)進入後,會進到下方頁面,然後會發現四行加密過的文字(都被我塗抹掉了)。
adfadssdsdds

最上方兩個是應用程式的key跟secret。下面兩個是oauth_token跟oauth_token_secret。這樣一來要的東西全到手了。

步驟4.用composer把該裝的裝好

要用tumblr的php api,要裝下面這些東西:
guzzle/guzzle >=3.1.x,<4
eher/oauth 1.0.x
tumblr/tumblr 0.2.0

可參考這裡:
https://github.com/tumblr/tumblr.php
https://packagist.org/packages/tumblr/tumblr

步驟5.寫php程式碼,程式碼如下

        
require_once '../vendor/autoload.php';  //依你的路徑自行修改。
$client = new TumblrAPIClient(tumblrAppKey, tumblrAppSecret);
        $client->setToken($oauth_token,$oauth_token_secret);
 
        $linkpost = array(
            'type'=>'link',
            'title'=>$title,
            'url'=>$url,
            'thumbnail'=>$picture,
            'excerpt'=>$message,
            'description'=>$description
        );  
        $client->createPost($blog-name, $linkpost);

基本上tumblr的php api以及應用程式說明,都可以參考下面網址:
https://github.com/tumblr/tumblr.php
https://www.tumblr.com/docs/en/api/v2

步驟6.寫成cron

既然都說是自動貼文了,不管你用什麼php framwork,程式碼寫好後,就寫個cron job吧,這樣就大功告成了。

粉絲團自動貼文:使用facebook php sdk > 4.0.*

要使用php sdk做粉絲團自動貼文步驟如下:

步驟1.取得app_id與app_secret

上https://developers.facebook.com/開一個app,之後會有app_id與app_secret。

步驟2.取得access_token

要讓應用程式取得使用者(粉絲團擁有者)的權限,也就是讓應用者能代替使用者貼文,這需要先取得access_token,因為之後會需要拿到page_tokens。
可以從這裡拿到:https://developers.facebook.com/tools/explorer。進去這個頁面後,Application點選剛剛開的應用程式,然後右邊點選get_page_tokens。之後就可以拿到上方的access_token。

步驟3.取得貼文權限

除了有access_token之外,還要讓使用者帳號授權給應用程式,所以通常需要寫個程式,透過登入(login dialog)來取得。而應用程式需要有以下權限:manage_pages與publish_pages。詳細說明可以看facebook官網

步驟4.取得long_lived_token

1.當使用者同意後,應用程式就有權限可以代替使用者貼文。不過透過第二步驟取得的access_token是short_lived_token,也就是只能用一個小時就沒用了。
如果我們要長期貼文,就需要取得long_lived_token。關於這部分的說明,可以看facebook說明頁面

2.基本上取得的步驟,可以從這個網址:
https://graph.facebook.com/oauth/access_token?grant_type=fb_exchange_token&client_id=aaa&client_secret=bbb&fb_exchange_token=ccc

3.上述aaa,bbb,ccc分別代表剛剛取得的app_id、app_secret、access_token。之後頁面會顯示一行字串,上面的access_token就是long_lived_token。要看是不是真的可以用兩個月,可以到以下網址:
https://developers.facebook.com/tools/debug/accesstoken?q=long_lived_token

4.有了long_lived_token之後,就要將它存到db,隨時取用,然後在兩個月內,透過上述步驟,定期手動更新,才不會過期。

步驟5.寫php程式

1.先用composer把php sdk裝起來。通常會在程式碼加入以下片段:

 require_once '../vendor/autoload.php';

只要確定有load進來即可。

2.記得宣告

 use Facebook;                                                                     
 use FacebookFacebookRequest; 

3.貼文的短程式碼範例

$fb = new FacebookFacebook([     
'app_id' => 'app_id',                               
'app_secret' => 'app_secret', 
'default_graph_version' => 'v2.2', 
]);
$linkData = [      
'message' => $message
];                                                                                                                                                                                     
 $response = $fb->post('/facebook_fanpage_id/feed', $linkData, $longLivedToken);  

facebook_fanpage_id就是粉絲團的專屬id,上面要的資料、參數都有了,接下來就可以自動透過程式貼文到粉絲團上了。

步驟6.寫成cron

透過上述步驟,應該可以順利自動貼文了,最後再寫成cron,就可以定期貼文,後端程式碼依個人需求自行設計。

相關文章:
1.How to post into a Facebook Page with PHP using Graph API
2.https://developers.facebook.com/docs/php/howto/example_post_links/5.0.0
3.access_token 官方說明頁面